
Institution guide
Run the accounts your teachers and students sign in with.
An institution administrator holds the keys to one thing above all: who exists in your institution and what they may do. This guide walks through every screen you will use, in the order you will meet them, with pictures taken from the live product. Most administrators also teach, so it shows the combined view: your teaching tools and your administration tools in the same panel.
Workflow 1
Signing in
Open the administration portal
Administration has its own address, separate from the student portal your learners use. Opening it hands you straight to Microsoft: there is no sign-in button to press first, because the portal never holds your password and has nothing to ask you for.
Enter your work email address
The first Microsoft screen asks for the address your institution issued you and nothing else. Continue from there.
Enter your password
The next screen asks for your password, with your address shown above it so you can confirm you are signing in as yourself. This screen belongs to Microsoft rather than to the portal. If you have forgotten your password, use the "Forgot password?" link here; no one in the portal can reset it for you.
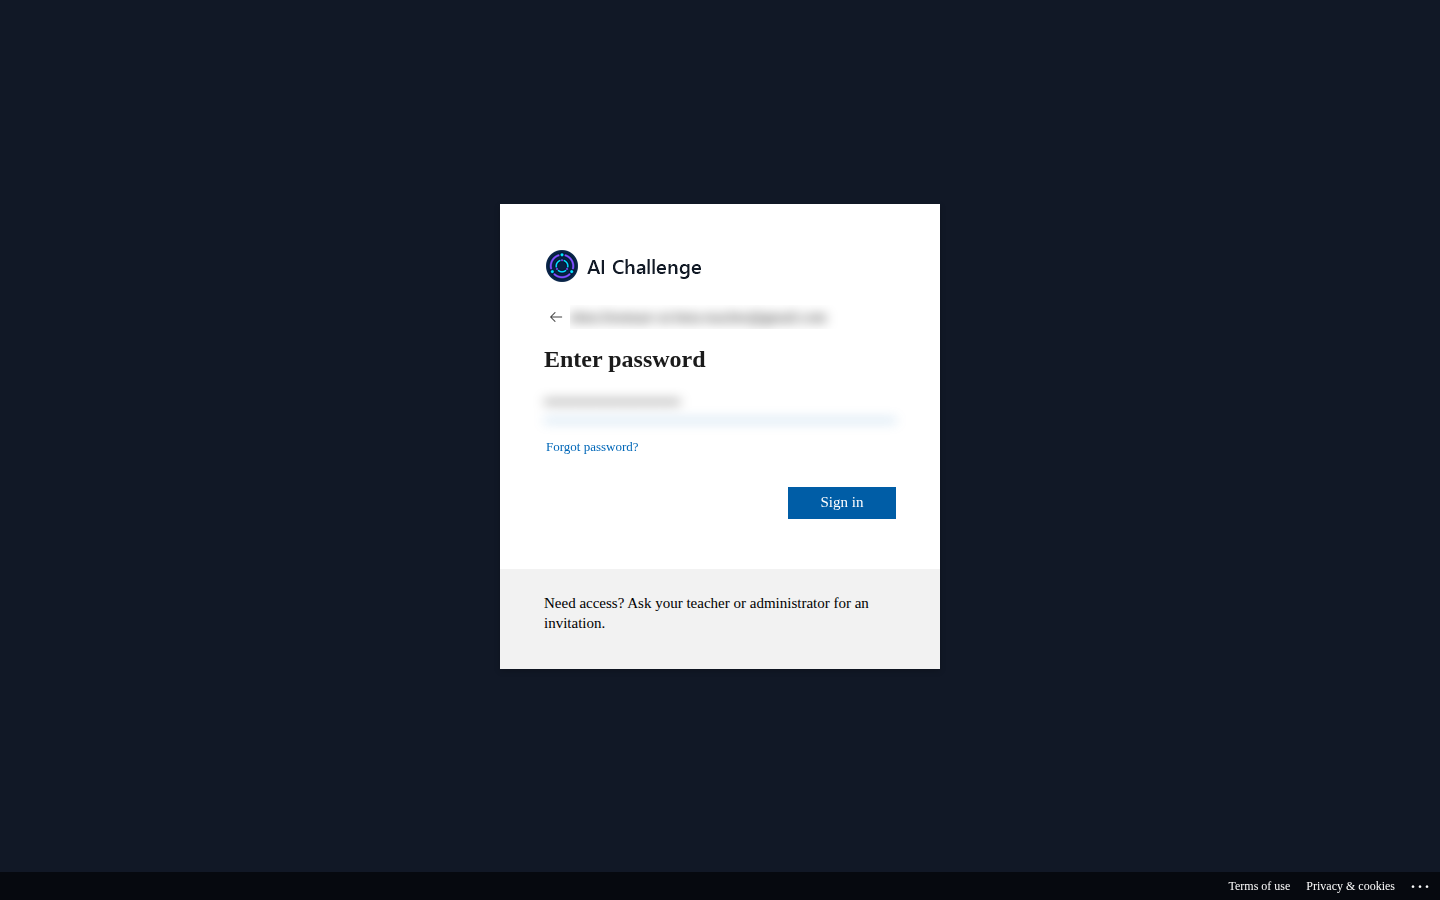
The password screen. The email address and the password box are deliberately blurred in this picture; on your screen they show normally. Wait for the portal to load
Microsoft hands you back to the portal by itself and the dashboard appears. Nothing needs to be clicked in between.
The first time only: the privacy policy and terms
Before the portal opens for the first time, it shows you links to the privacy policy and the terms of use and asks you to tick both boxes and choose Agree. Nothing else loads until you do. Your answer is recorded against the version of each document you accepted, so you will only be asked again if one of them changes.
Workflow 2
Reading your navigation panel
Find the two halves of your role
The panel down the left side is grouped, and the groups are the point. The items at the top are the teaching tools: Dashboard, Templates, Rosters, Assignments, Reports and Safeguards. Beneath them, under the heading Institution administration, sit the two screens this guide is about: Institutions and Institution users. Under Legal at the bottom are the privacy policy and the terms of use.
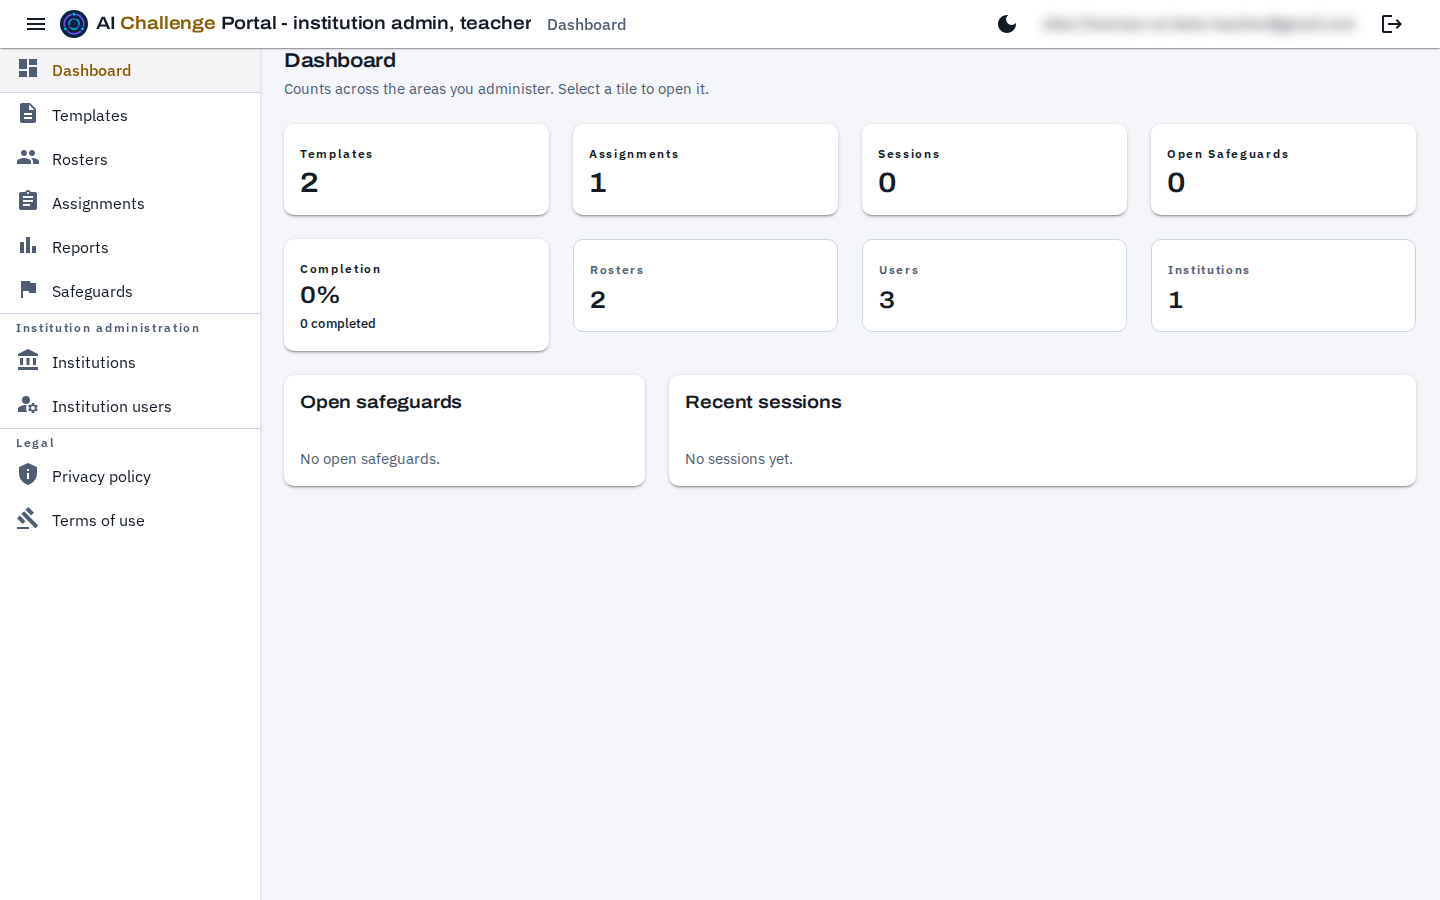
The dashboard as it appears after signing in. The Institution administration group is what your administrative capacity adds; your email address is shown at the top right. Know why a group is there
Nothing in the panel is decoration: each group appears because of something recorded about you. The teaching tools appear because you teach or administer. The Institution administration group appears because you hold the administrator capacity on at least one institution. If a group you expect is missing, the record behind it is missing, not the screen.
Read the counting tiles
The dashboard itself counts what you administer: templates, assignments, sessions, open safeguards, completion, rosters, users and institutions. Each tile opens the list behind it, and the two panels underneath show open safeguards and recent sessions, so an empty pair means nothing is waiting on you.
Use the app bar
Across the top sit the menu button, which folds the panel away on a narrow screen, your signed-in address, a theme switch between light and dark, and Sign out. They stay in place on every screen in this guide.
Workflow 3
Your institution and its members
Open Institutions
Choosing Institutions under Institution administration lists the institutions you administer, and only those. Each row shows the institution's name and its domain, with a search box above for when you administer several.
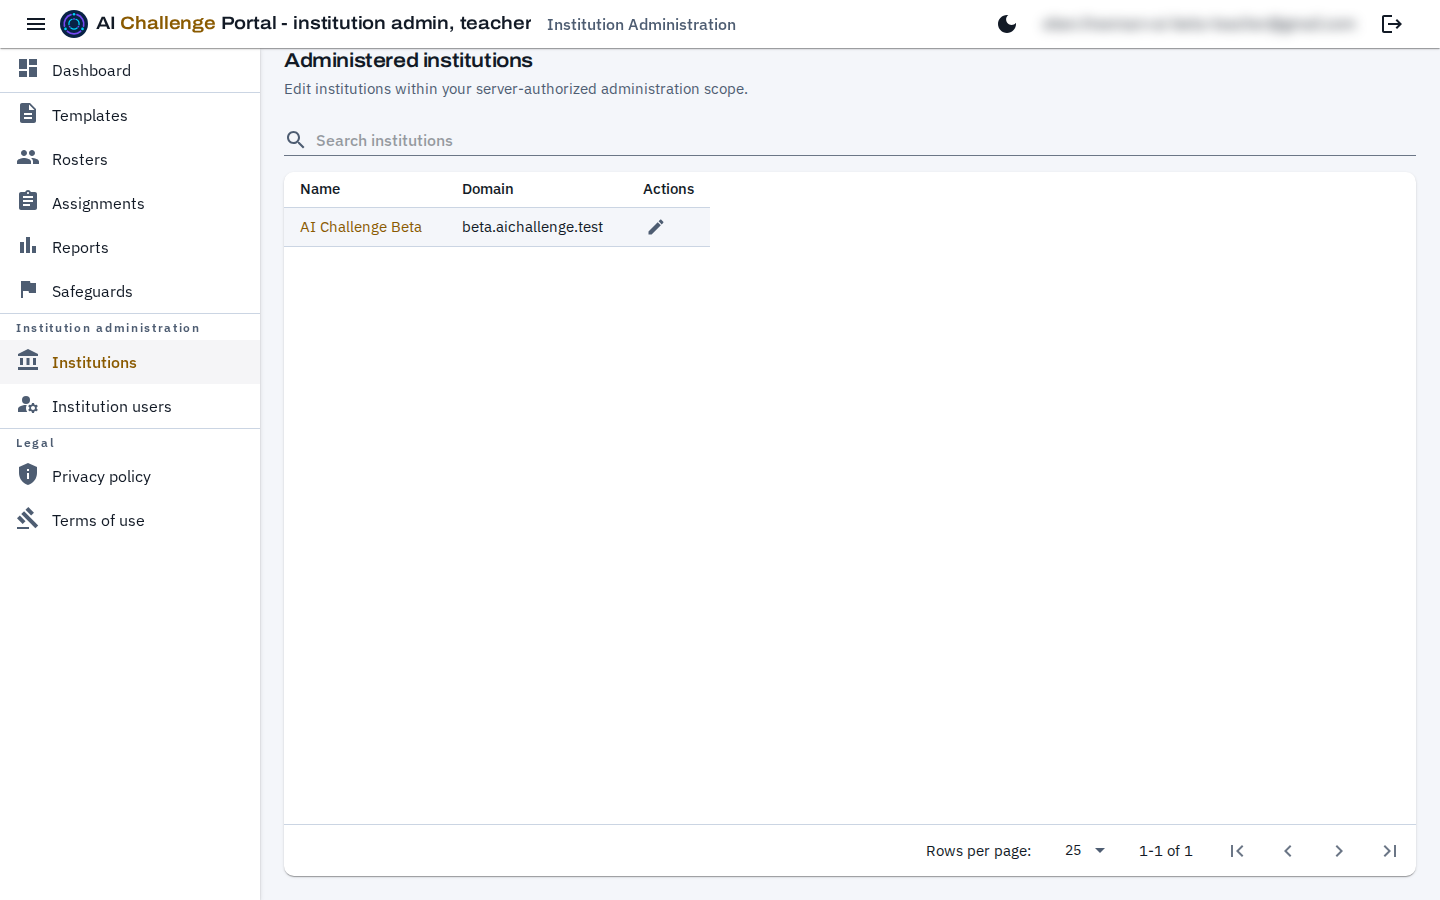
The institutions you administer. Most administrators see exactly one row here. Open the institution itself
The name is a link, and the pencil beside it goes to the same place: one page holding the institution's details at the top and its membership underneath. Name and Domain are editable; Save applies them, Cancel returns you to the list.
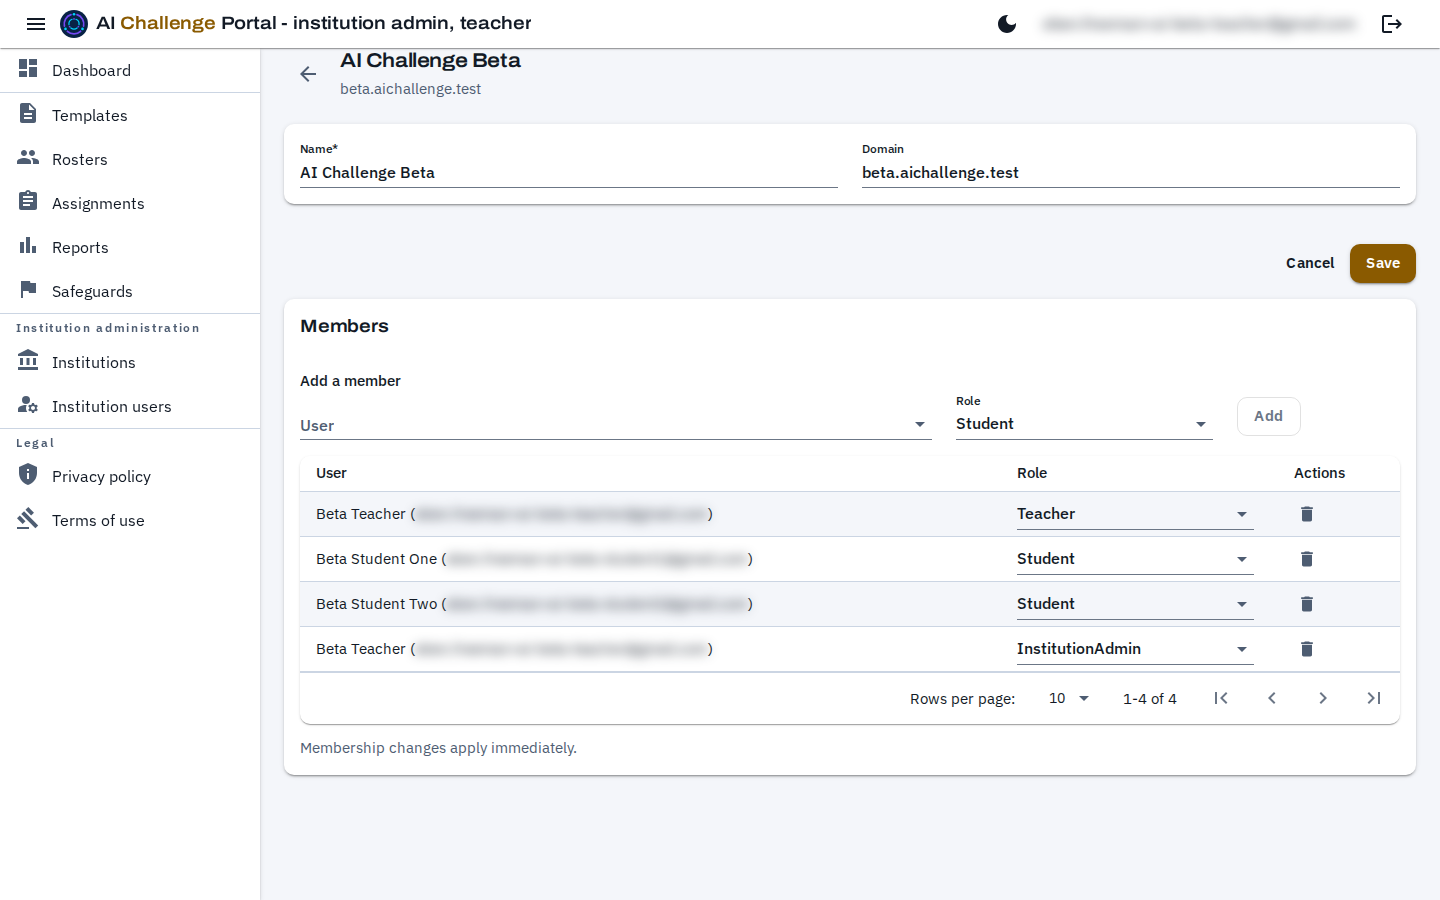
The institution page. The membership grid is the lower half; the email addresses beside each member's name are blurred in this picture. Read the membership grid
One row per capacity, not one row per person. Membership is a set, so the same person can appear twice: once as a Teacher and once as an InstitutionAdmin. That is how an administrator who also teaches is recorded, and it is why removing one row never removes the other.
Grant someone a capacity
In Add a member, choose the role first and then find the person, because the list of people offered depends on which capacity you are granting. Add applies it at once: there is no separate Save for membership, and the note under the grid says so.
Expect administrator access to arrive at the next sign-in
Granting InstitutionAdmin is the one change that is not instantly visible to the person receiving it. The portal says so when you make it: their session was built when they signed in, so the new group appears in their panel the next time they sign in, not while they are looking at it.
Change or withdraw a capacity
The role beside each member is a live control; changing it changes that membership. The bin at the end of the row removes that capacity entirely. Neither deletes the person's account, and neither touches their membership of any other institution.
Workflow 4
The people in your institution
Open Institution users
This is the roll of everyone in one institution. If you administer more than one, the Institution box at the top chooses which; if you administer exactly one, it is already chosen for you.
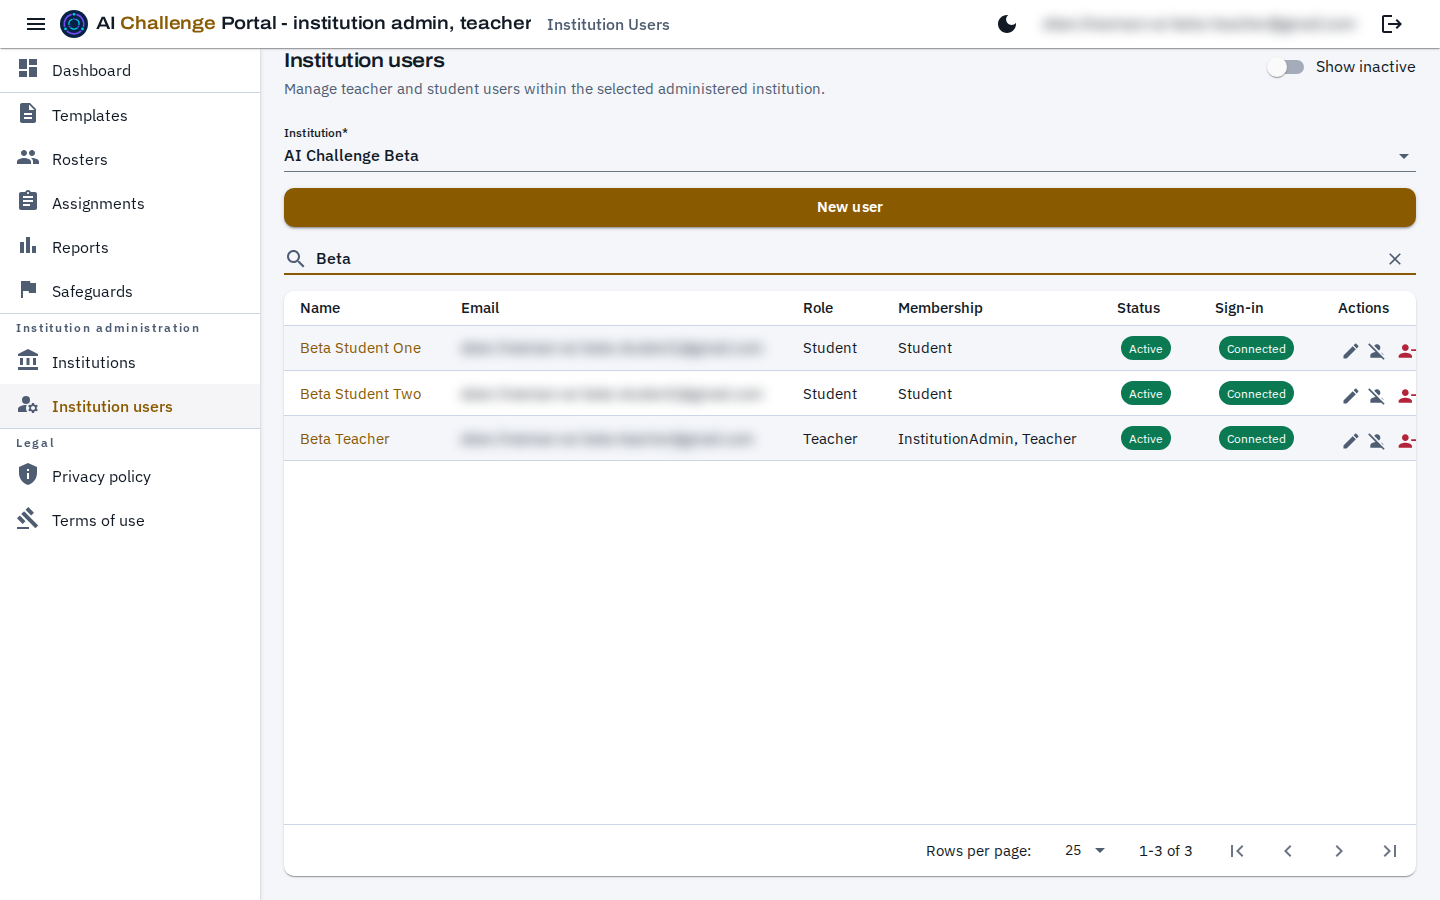
The institution users list, narrowed by its search box. The email addresses in the second column are blurred in this picture. Read the columns
Name, email and role describe the account. Membership lists every capacity that person holds in the selected institution, so a teacher who also administers reads as both. Status is Active or Inactive. Sign-in is the one to watch: Connected means the account can actually sign in, and Needs attention means the portal has a record for them but Microsoft has no account behind it yet.
Narrow a long list
The search box filters on name and address, across the whole institution rather than only the page you are looking at. The list pages at twenty-five rows. The Show inactive switch above brings back people who have been deactivated, who are hidden by default.
Repair a sign-in that says Needs attention
The menu at the end of a row carries two repairs. Connect to Entra creates the missing Microsoft account for a person who has a portal record but no sign-in, and reveals a temporary password exactly as creating a user does. Resync Entra roles re-applies what their role and memberships say they should be allowed to do, for the rare case where the two have drifted apart.
Workflow 5
Adding a user
Choose New user
New user above the list opens a form on its own page. It creates the person in the institution you have selected, so check the Institution box before you start.
Fill in the form
Display Name and Email are required, and Email is permanent: it is the identity the person signs in with, so it cannot be changed afterwards. Role is Teacher or Student. Locale defaults to en-US, and Date of Birth is optional.
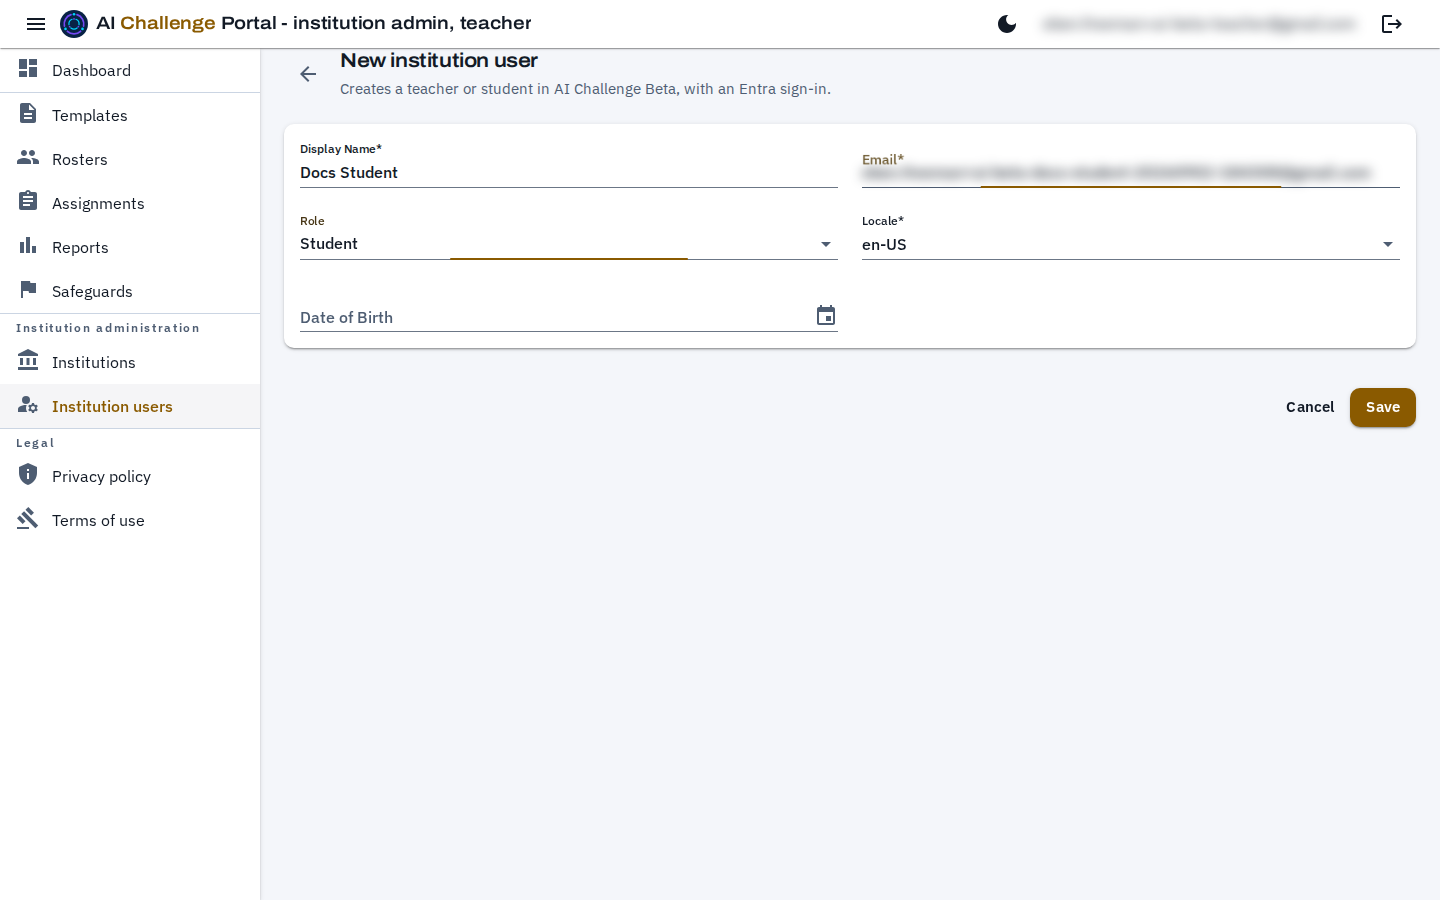
The create form, filled in and ready to save. The address is blurred in this picture; type the person's real address here. Save, and copy the temporary password
Saving does three things in order: it creates the portal record, it creates the Microsoft account they sign in with, and it applies the permissions their role implies. It then shows you a one-time password. This is the only time it is ever shown. Copy it before you close the dialog; nothing in the portal can show it to you again, and a lost one has to be repaired from the row menu.
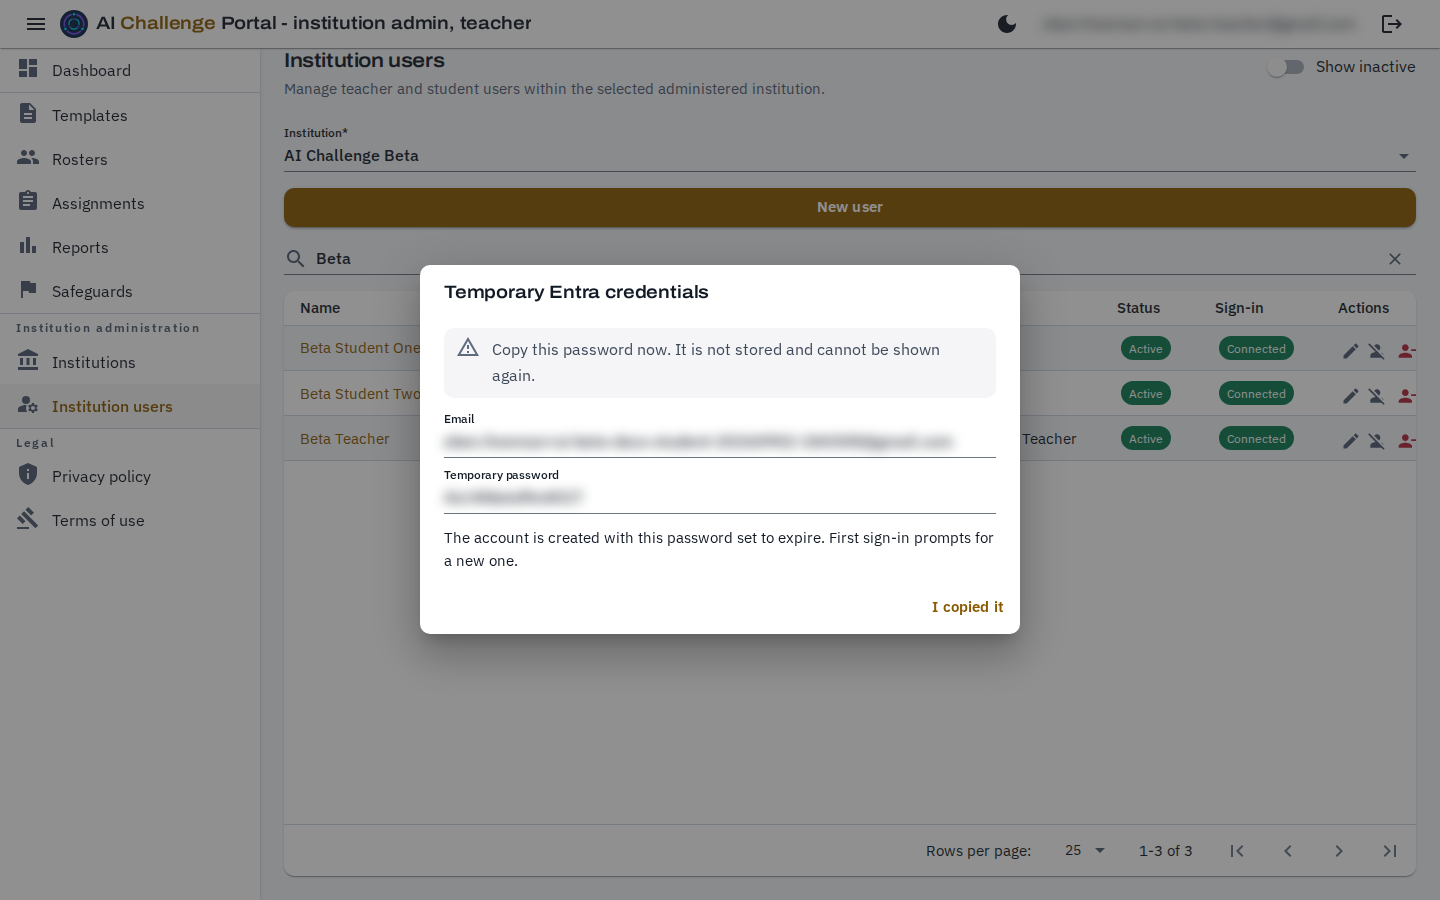
The one-time password reveal. Both the address and the password are blurred in this picture; on your screen the password is readable exactly once. Hand it over safely, and only once
Send the address and the password over a channel you would trust with any other credential, and to that person only. They are required to choose a password of their own the first time they sign in, so the one you copied stops working as soon as they use it.
Read the dialog when it warns you
If the Microsoft side only partly succeeded, the dialog says so instead of failing silently. The portal record is kept either way; use Connect to Entra or Resync Entra roles from the row menu to finish the job rather than creating the person a second time.
Workflow 6
Editing a user and withdrawing access
Open a person's page
Their name, or the pencil in their row, opens the same form you filled in to create them, with two fields now fixed. Email cannot change because it is how they sign in, and Primary Role is shown but not editable. Display Name, Locale and Date of Birth remain yours to correct.
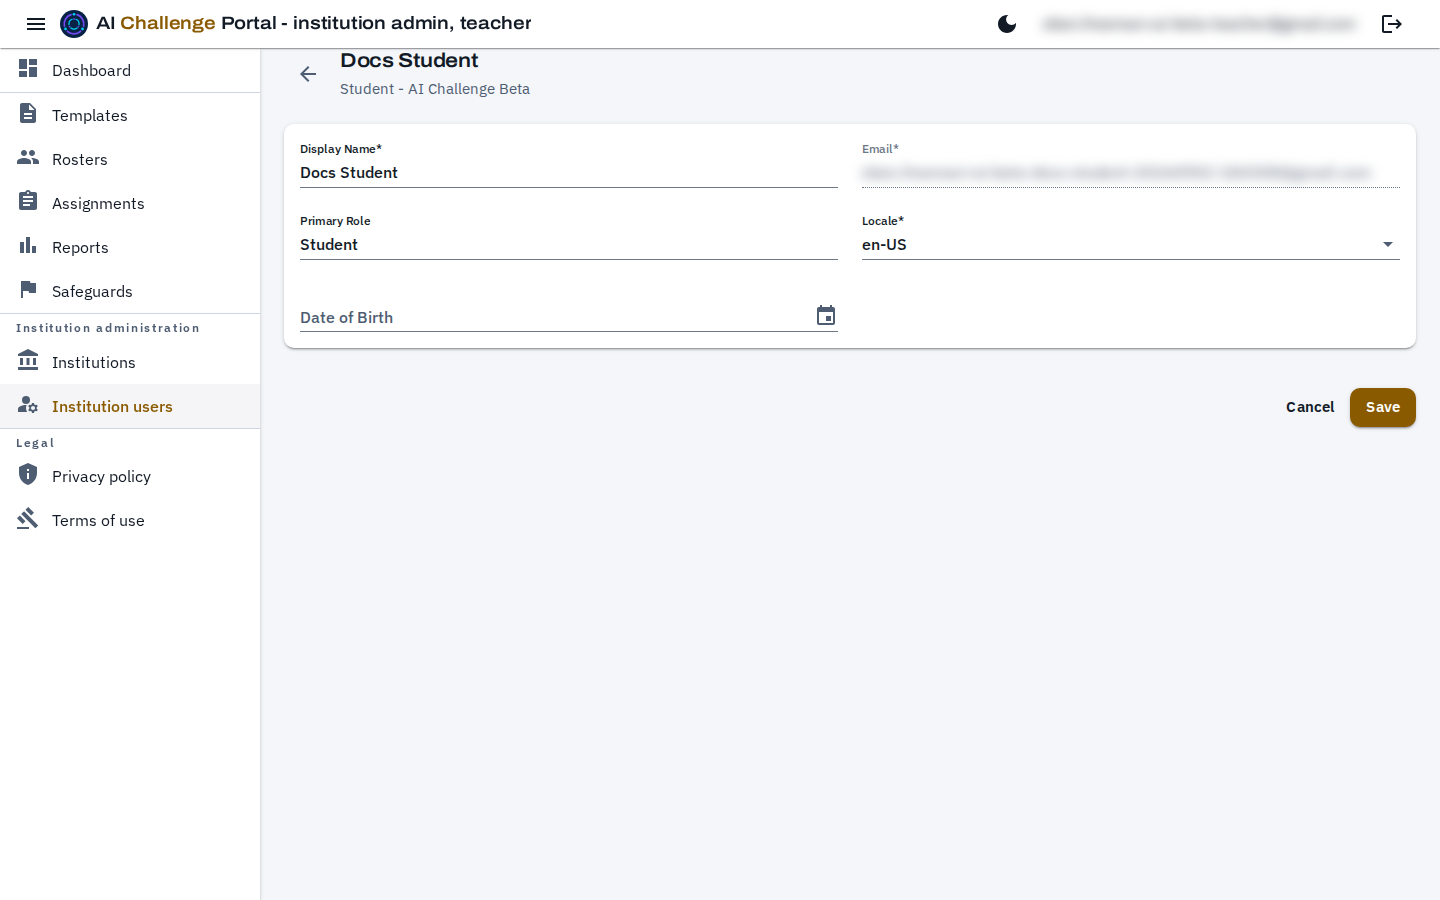
An existing user's page. The greyed fields are the ones fixed at creation. Choose the right way to withdraw access
Three actions in the row look similar and are not. Remove takes the person out of this institution and leaves the account alone. Deactivate switches the account itself off, here and at Microsoft, and keeps every membership and all their history. Editing a membership on the institution page changes only what they may do, not whether they may sign in.
Confirm the removal
Removing asks first, and says exactly what it will do: other institution memberships remain intact. It is the right choice when someone has left your institution but their work should stay where it is.
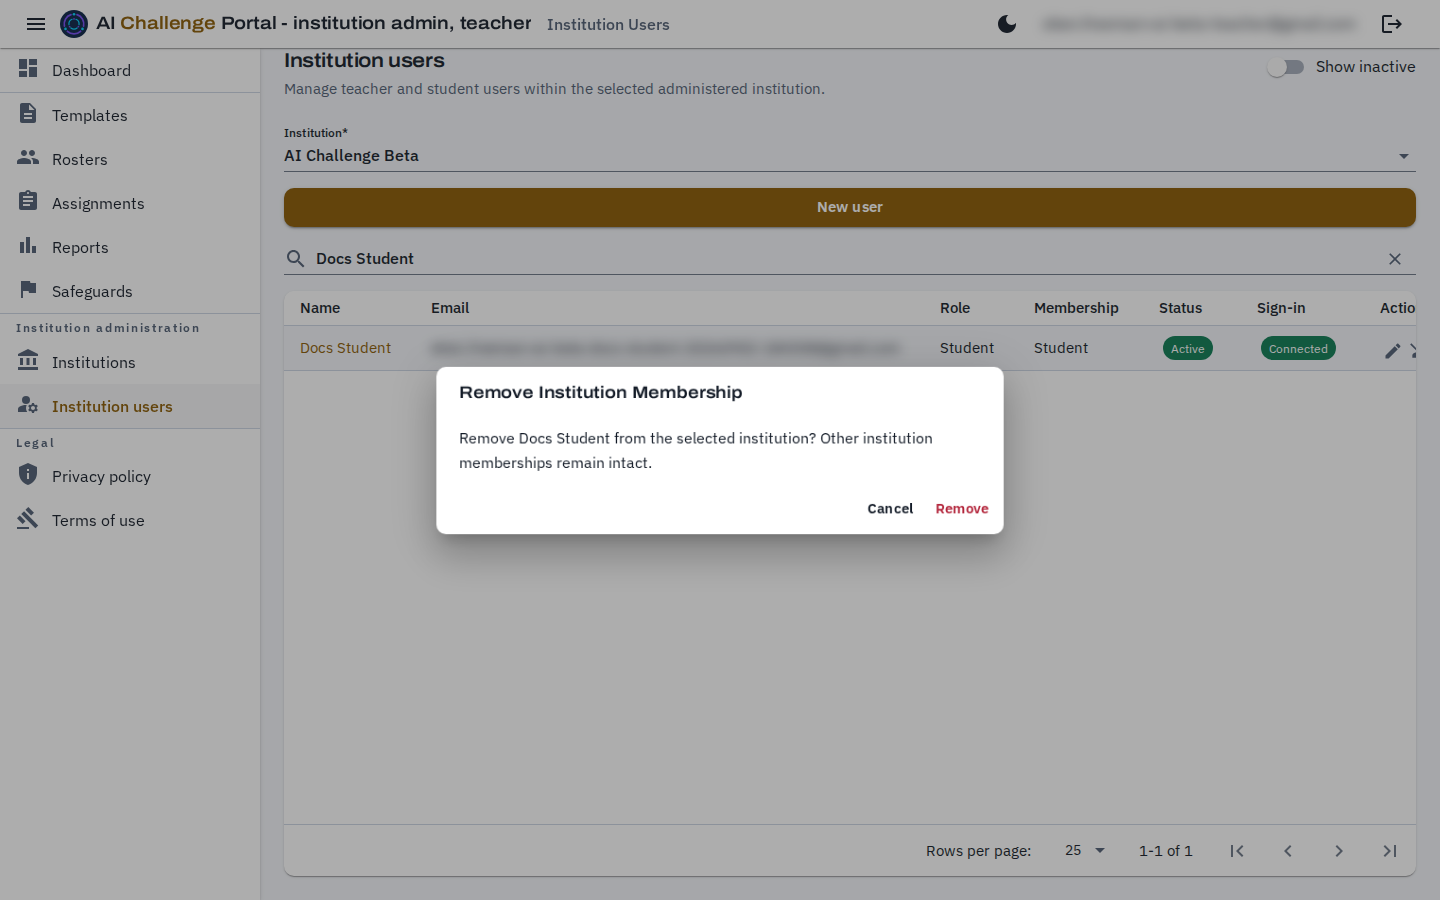
The removal confirmation. Deactivation asks in the same way, and says what it will do instead. Prefer deactivation to deletion
An account with any history behind it cannot be deleted at all, by design: sessions, reports and safeguarding records must keep pointing at a real person. Deactivating is what you want in almost every case, and it can be undone from the same control.
Beta boundary
What is live now, and what is not
Live today: administering the institutions you hold the capacity on, managing their users and each person's capacities, creating sign-ins with a one-time password, and the teaching tools when you also teach. Not yet built: seats and billing, inviting people by email rather than handing them a password, institution-wide dashboards, and institution-level report export. Coordinate anything in that second list with the platform team.
Workflow 7
Legal documents and signing out
Read the documents your people accepted
About at the bottom of the panel names the version you are running and links the Privacy policy, the Terms of use and the Third-party notices, each opening in a new tab. The first two are the same documents every teacher and student is asked to accept before the portal opens for them, and the same ones you accepted at your first sign-in. The third lists the open-source components the portals deliver to a browser.
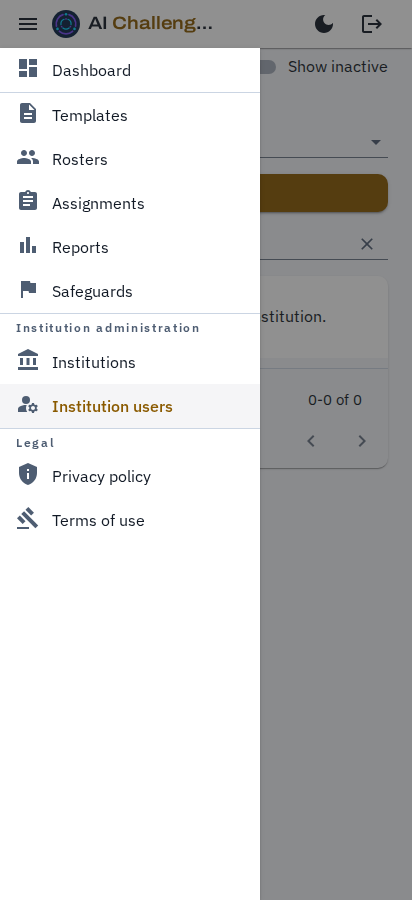
The navigation panel on a narrow screen, opened from the menu button. It carries the same three groups the docked panel does. Sign out when you are finished
Sign out at the top right ends the session at Microsoft as well as in the portal, which matters on a shared machine. It leaves you on a plain confirmation page with a way back in.
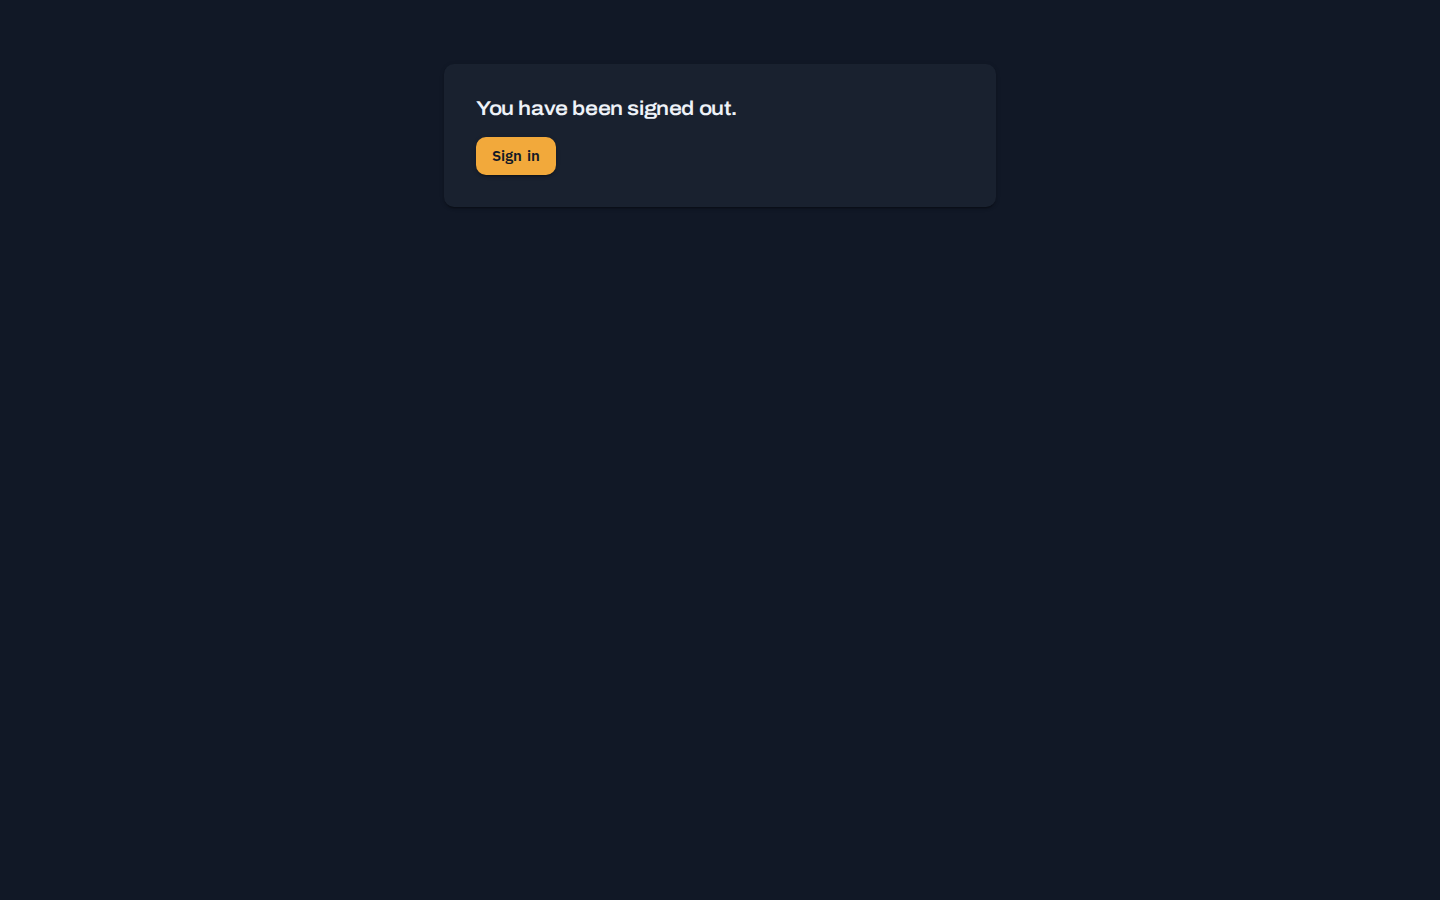
After signing out. Signing in again starts the round trip through Microsoft from the beginning.
Choose an escalation owner before launch
The system can pause a session and preserve the visible record for review. Your institution must define who reviews flags, what escalation means locally, and how students receive support.